Introduction:
Embarking on the journey of setting up your own server or machine with Q4OS Linux is a thrilling venture into the world of open-source flexibility and robust performance. Whether you’re a seasoned tech enthusiast or a curious beginner, this comprehensive tutorial is your roadmap to mastering the intricacies of Q4OS Linux configuration.
What You’ll Learn:
- Installation and Configuration: We’ll guide you through the seamless installation process of Q4OS Linux, ensuring a smooth setup on your machine or server.
- Apache Web Server Mastery: Dive into the realm of web hosting as we demonstrate how to install and configure the Apache web server, turning your Linux setup into a powerful hosting solution.
- Ngrok Unleashed: Learn the magic of Ngrok for secure and efficient tunneling. We’ll show you how to expose your local server to the web, making your hosted content accessible globally.
Why Q4OS Linux?
Q4OS Linux stands out for its lightweight design, user-friendly interface, and rock-solid stability. It’s the perfect choice for those seeking a reliable foundation for their server or machine.
So, whether you’re looking to host your website, set up a development environment, or simply explore the capabilities of Q4OS Linux, join us on this educational journey. Let’s empower you to take control of your digital domain!
Let’s dive in and make your Q4OS Linux experience extraordinary! 🚀🐧🔧”
Step 1: Q4OS Linux Machine Setup
Congratulations on successfully installing Q4OS Linux on your machine! If you haven’t done so yet, make sure to follow the installation guide provided by the Q4OS community.
Verify Your Installation:
- Boot into Q4OS: Ensure that your machine boots into the Q4OS Linux environment. You should see the Q4OS desktop, indicating a successful installation.
- System Updates: Open the terminal and run the following commands to update your system:
sudo apt update
sudo apt upgrade
This ensures that your system is equipped with the latest software packages.
System Readiness:
Your Q4OS Linux machine is now set up and ready for the next steps in our tutorial. In the upcoming steps, we’ll delve into installing and configuring the Apache web server, setting up ngrok for tunneling, and more.
Step 2: Install Apache2
Now that your Q4OS Linux machine is up and running, let’s proceed to install the Apache2 web server. Apache is a powerful and widely used web server that will turn your Q4OS machine into a hosting powerhouse.
- Open a terminal on your Q4OS machine. You can do this by clicking on the terminal icon in your desktop environment or by using the keyboard shortcut
Ctrl + Alt + T. - To install Apache2, enter the following command:
sudo apt install apache2- This command will prompt you to confirm the installation by typing ‘Y’ and pressing ‘Enter’. The system will then download and install Apache2 and its dependencies.
- Once the installation is complete, start the Apache2 service:
sudo systemctl start apache2To ensure that Apache2 starts automatically at boot, run:
sudo systemctl enable apache2- This ensures that Apache2 will start automatically whenever you restart your Q4OS machine.
- To check the status of the Apache2 service, you can use:

Step 3: Test Apache2 Installation
Now that Apache2 is installed on your Q4OS Linux machine, let’s test its functionality by accessing the default page using your web browser.
- Open your web browser on the Q4OS machine.
- In the address bar, type the following and press Enter:
127.0.0.1:80- This URL corresponds to the default local address of your Apache2 server on port 80.
- If Apache2 is successfully installed, you should see the default Apache2 web page. It typically says “It works!” or something similar.

This confirms that your Apache2 web server is up and running.
Step 4: Customize Default Site and Upload Files
Now that Apache2 is running successfully, let’s customize the default site by changing its content and uploading some files.
- Navigate to Apache2 Default Site Directory:Open a terminal and navigate to the default Apache2 site directory. This is typically located at
/var/www/html/. Use the following command:
cd /var/www/html/Edit the Default Index Page:
Open the default index.html file with a text editor. You can use nano, for example:
sudo nano index.html- Replace the existing content with your own HTML. Save the changes.
- Upload Additional Files:If you have additional files (e.g., images, CSS, JavaScript) to include in your site, you can upload them to the
/var/www/html/directory. - Restart Apache:After making changes, restart Apache to apply them:
sudo systemctl restart apache2
Test Your Changes:
Go back to your web browser and refresh the page at 127.0.0.1:80. You should now see the updated content and any additional files you uploaded.

Step 5: Install Ngrok
Download Ngrok:
Open a terminal and run the following commands to download the Ngrok binary:
wget https://bin.equinox.io/c/4VmDzA7iaHb/ngrok-stable-linux-amd64.zip
Unzip the Archive:
Unzip the downloaded file using the following command:
unzip ngrok-stable-linux-amd64.zip
Move Ngrok to a Directory in Your $PATH:
Move the ngrok binary to a directory that is included in your system’s $PATH. The /usr/local/bin directory is a common choice:
sudo mv ngrok /usr/local/bin/
Once the installation is complete, you can proceed to authenticate Ngrok with your account using your authentication token:
ngrok authtoken 2RNVyXqVRVQKWhL2EV9jK8vPGqx_4bho91fM4354fddf32To start a HTTP tunnel forwarding to your local port 8080, run this next:
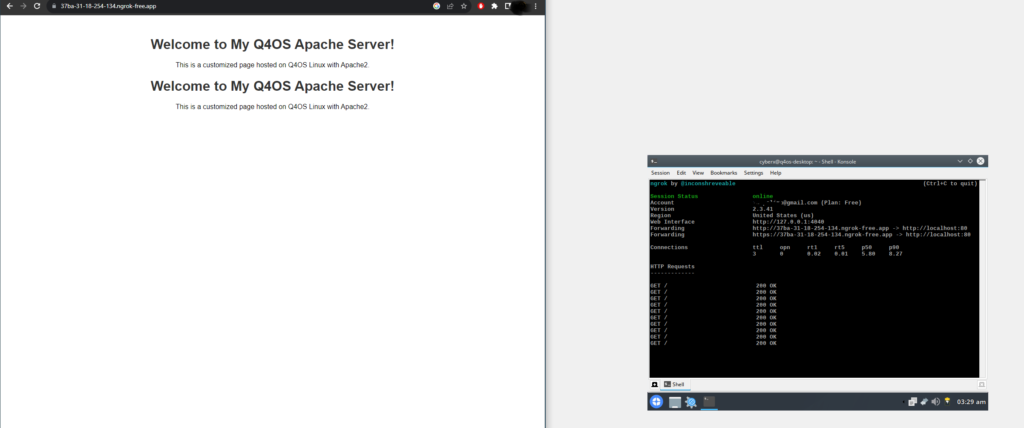
ngrok http 80
That’s it! Your Q4OS Linux machine with Apache and Ngrok is now a live web host. Feel free to share the provided Ngrok URL with others to showcase your website. If you have any further questions or if there’s anything else I can help you with, let me know! 🌐🚀